Storage Network
Harvester uses Longhorn as its built-in storage system to provide block device volumes for VMs and Pods. If the user wishes to isolate Longhorn replication traffic from the Kubernetes cluster network (i.e. the management network) or other cluster-wide workloads. Users can allocate a dedicated storage network for Longhorn replication traffic to get better network bandwidth and performance.
For more informations, please refer Longhorn Storage Network
Configuring Longhorn settings directly is not recommended, as this can lead to untested situations.
Prerequisites
There are some prerequisites before configuring the Harvester Storage Network setting.
- Well-configured Cluster Network and VLAN Config.
- Users have to ensure the Cluster Network is configured and VLAN Config will cover all nodes and ensure the network connectivity is working and expected in all nodes.
- All VMs should be stopped.
- We recommend checking the VM status with the following command and should get an empty result.
kubectl get -A vmi
- All pods that are attached to Longhorn Volumes should be stopped.
- Users could skip this step with the Harvester Storage Network setting. Harvester will stop Longhorn-related pods automatically.
If the Harvester cluster was upgraded from v1.0.3, please check if Whereabouts CNI is installed properly before you move on to the next step. We will always recommend following this guide to check. Issue 3168 describes that the Harvester cluster will not always install Whereabouts CNI properly.
- Verify the
ippools.whereabouts.cni.cncf.ioCRD exists with the following command.kubectl get crd ippools.whereabouts.cni.cncf.io
- If the Harvester cluster doesn't have
ippools.whereabouts.cni.cncf.io, please add these two CRDs before configuringstorage-networksetting.
kubectl apply -f https://raw.githubusercontent.com/harvester/harvester/v1.1.0/deploy/charts/harvester/dependency_charts/whereabouts/crds/whereabouts.cni.cncf.io_ippools.yaml
kubectl apply -f https://raw.githubusercontent.com/harvester/harvester/v1.1.0/deploy/charts/harvester/dependency_charts/whereabouts/crds/whereabouts.cni.cncf.io_overlappingrangeipreservations.yaml
Configuration Example
- VLAN ID
- Please check with your network switch setting, and provide a dedicated VLAN ID for Storage Network.
- Well-configured Cluster Network and VLAN Config
- Please refer Networking page for more details and configure
Cluster NetworkandVLAN Configbut notNetworks.
- Please refer Networking page for more details and configure
- IP range for Storage Network
- IP range should not conflict or overlap with Kubernetes cluster networks(
10.42.0.0/16,10.43.0.0/16,10.52.0.0/16and10.53.0.0/16are reserved). - IP range should be IPv4 CIDR format and 4 times the number of your cluster nodes. Longhorn will use 2 IPs per node, and the upgrade process will run two versions of Longhorn simultaneously. It will consume 4 IPs per node in the upgrade process.
- If your cluster has 250 nodes, the IP range should be larger than
/22.
- IP range should not conflict or overlap with Kubernetes cluster networks(
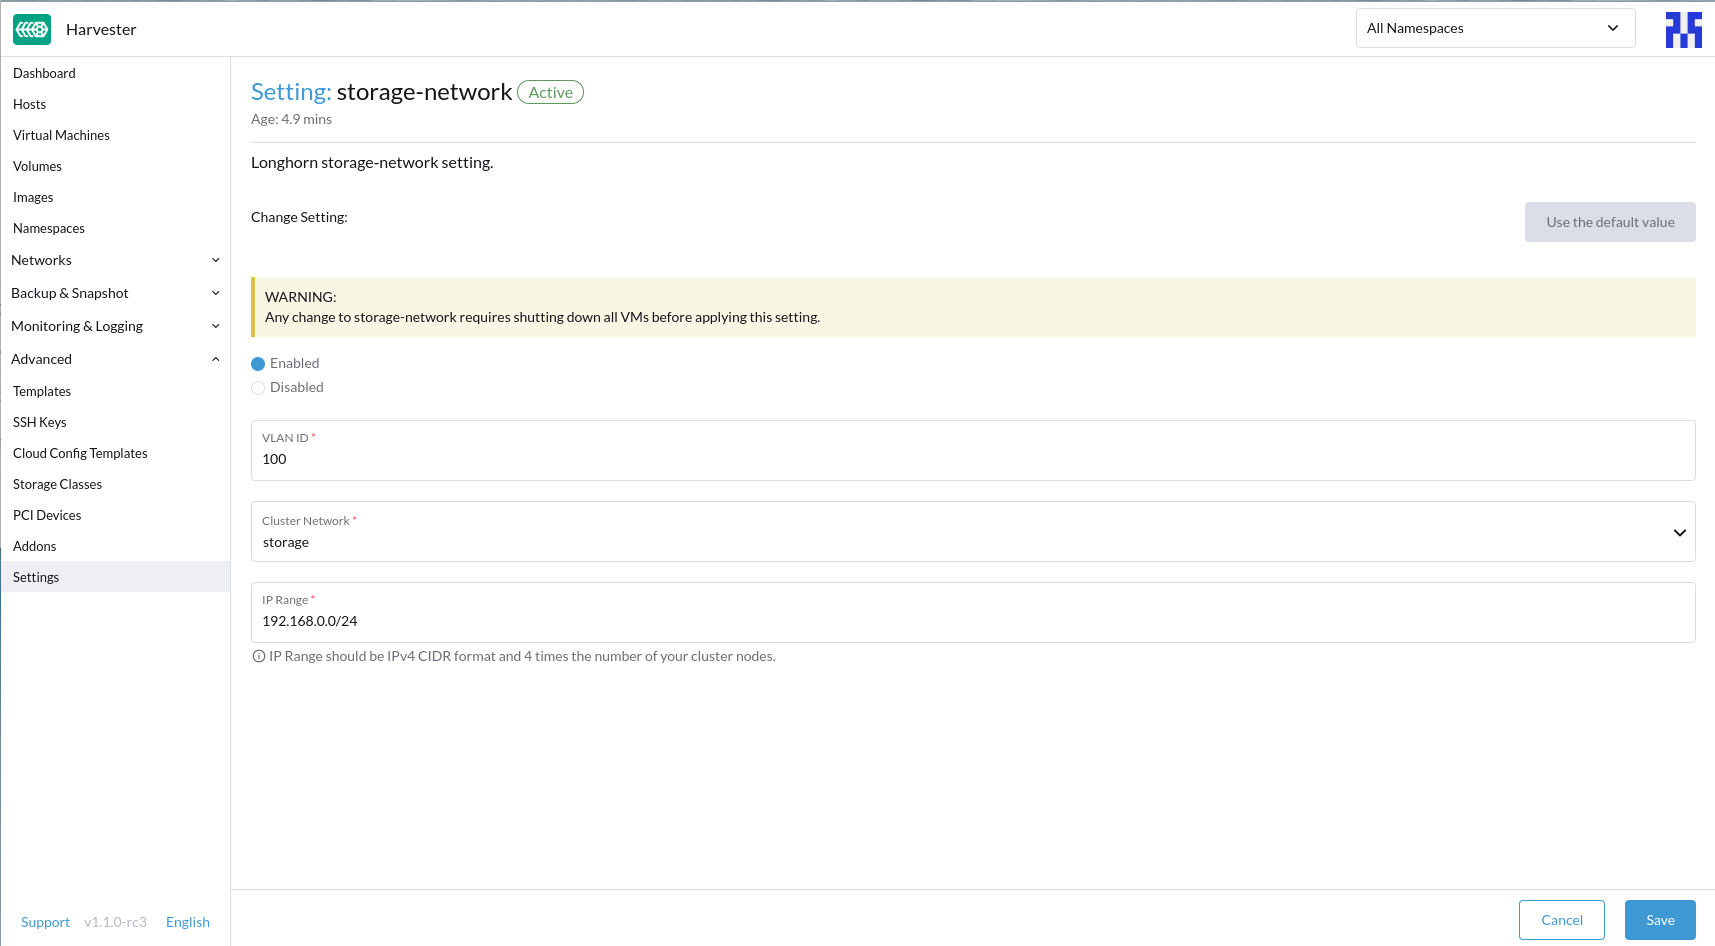
We will take the following configuration as an example to explain the details of the Storage Network
- VLAN ID for Storage Network:
100 - Cluster Network:
storage - IP range:
192.168.0.0/24
Configuration Process
Harvester will create Multus NetworkAttachmentDefinition from the configuration, stop pods related to Longhorn Volume, update Longhorn setting, and restart previous pods.
Before Applying Harvester Storage Network Setting
Here we have two cases.
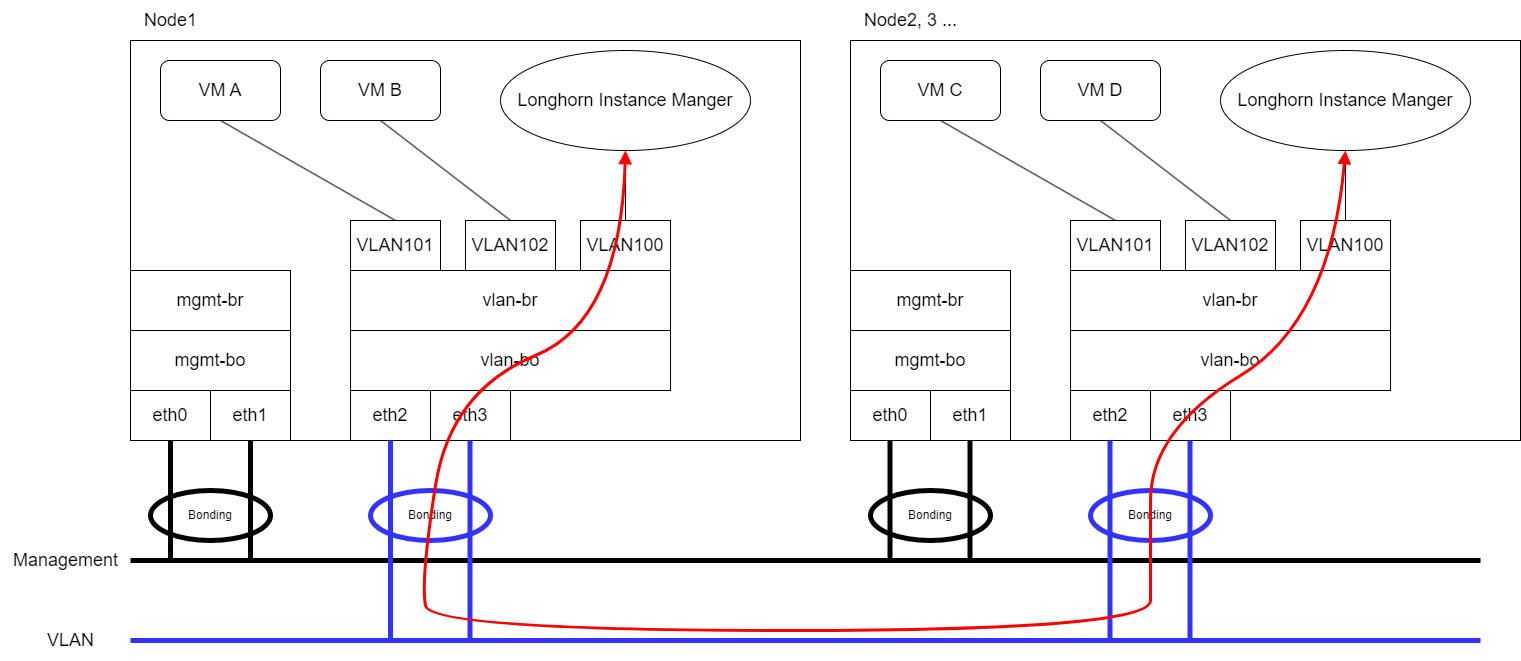
- Expect that VM VLAN traffic and Longhorn Storage Network use the same group of physical interfaces.
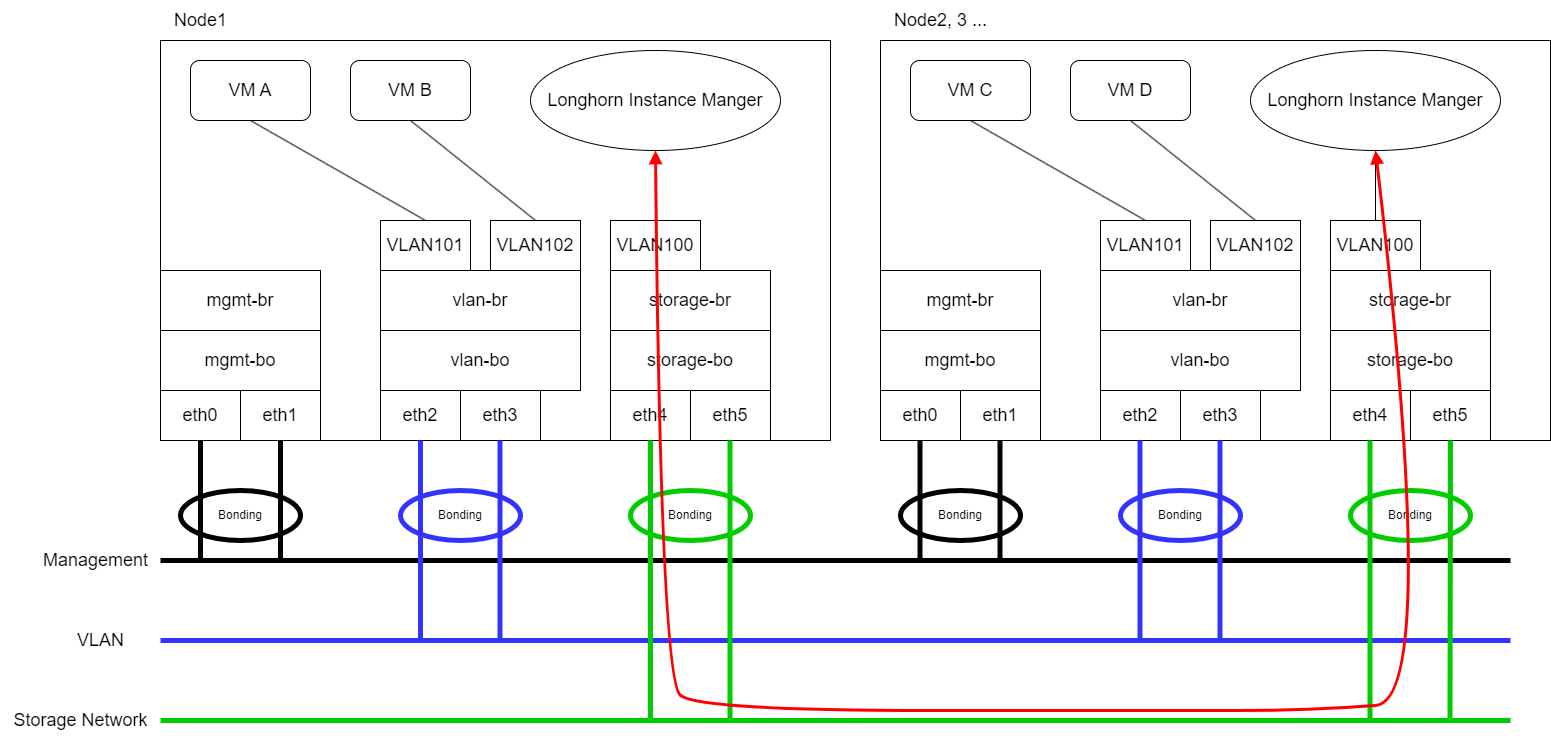
- Expect that VM VLAN traffic and Longhorn Storage Network use different physical interfaces.
Longhorn will send replication traffic through the specific interfaces shown as the red line in the figure.
Same Physical Interfaces
Take eth2 and eth3 as an example for VM VLAN traffic and Longhorn Storage Network simultaneously.
Please refer Networking page to configure ClusterNetwork and VLAN Config with eth2 and eth3 and remember the ClusterNetwork name for the further step.
Different Physical Interfaces
eth2 and eth3 are for VM VLAN Traffic. eth4 and eth5 are for Longhorn Storage Network.
Please refer Networking page to configure ClusterNetwork and VLAN Config with eth4 and eth5 for Storage Network and remember the ClusterNetwork name for the further step.
Harvester Storage Network Setting
Harvester Storage Network setting will need range, clusterNetwork, vlan field to construct Multus NetworkAttachmentDefinition for Storage Network usage. You could apply this setting via Web UI or CLI.
Web UI
Harvester Storage Network setting could be easily modified on the Settings > storage-network page.
CLI
Users could use this command to edit Harvester Storage Network setting.
kubectl edit settings.harvesterhci.io storage-network
The value format is JSON string or empty string as shown in below.
{
    "vlan": 100,
    "clusterNetwork": "storage",
    "range": "192.168.0.0/24"
}
The full configuration will be like this example.
apiVersion: harvesterhci.io/v1beta1
kind: Setting
metadata:
  name: storage-network
value: '{"vlan":100,"clusterNetwork":"storage","range":"192.168.0.0/24"}'
Because of the design, Harvester will treat extra and insignificant characters in JSON string as a different configuration.
After Applying Harvester Storage Network Setting
After applying Harvester's Storage Network setting, Harvester will stop all pods that are related to Longhorn volumes. Currently, Harvester has some pods listed below that will be stopped during setting.
- Prometheus
- Grafana
- Alertmanager
- VM Import Controller
Harvester will also create a new NetworkAttachmentDefinition and update the Longhorn Storage Network setting.
Once Longhorn setting is updated, Longhorn will restart all instance-manager-r and instance-manager-e to apply the new network configuration, and Harvester will restart pods.
Harvester will not start VM automatically. Users should check whether the configuration is completed or not in the next section and start VM manually on demand.
Verify Configuration is Completed
Step 1
Check if Harvester Storage Network setting's status is True and the type is configured.
kubectl get settings.harvesterhci.io storage-network -o yaml
Completed Setting Example:
apiVersion: harvesterhci.io/v1beta1
kind: Setting
metadata:
  annotations:
    storage-network.settings.harvesterhci.io/hash: da39a3ee5e6b4b0d3255bfef95601890afd80709
    storage-network.settings.harvesterhci.io/net-attach-def: ""
    storage-network.settings.harvesterhci.io/old-net-attach-def: ""
  creationTimestamp: "2022-10-13T06:36:39Z"
  generation: 51
  name: storage-network
  resourceVersion: "154638"
  uid: 2233ad63-ee52-45f6-a79c-147e48fc88db
status:
  conditions:
  - lastUpdateTime: "2022-10-13T13:05:17Z"
    reason: Completed
    status: "True"
    type: configured
Step 2
- Check if all Longhorn
instance-manager-eandinstance-manager-rare ready and networks are correct. - Check if Annotations
k8s.v1.cni.cncf.io/network-statushas an interface namedlhnet1and the IP address is in the IP range.
Users could use the following command to show all Longhorn Instance Manager to verify.
kubectl get pods -n longhorn-system -l longhorn.io/component=instance-manager -o yaml
Correct Network Example:
apiVersion: v1
kind: Pod
metadata:
  annotations:
    cni.projectcalico.org/containerID: 2518b0696f6635896645b5546417447843e14208525d3c19d7ec6d7296cc13cd
    cni.projectcalico.org/podIP: 10.52.2.122/32
    cni.projectcalico.org/podIPs: 10.52.2.122/32
    k8s.v1.cni.cncf.io/network-status: |-
      [{
          "name": "k8s-pod-network",
          "ips": [
              "10.52.2.122"
          ],
          "default": true,
          "dns": {}
      },{
          "name": "harvester-system/storagenetwork-95bj4",
          "interface": "lhnet1",
          "ips": [
              "192.168.0.3"
          ],
          "mac": "2e:51:e6:31:96:40",
          "dns": {}
      }]
    k8s.v1.cni.cncf.io/networks: '[{"namespace": "harvester-system", "name": "storagenetwork-95bj4",
      "interface": "lhnet1"}]'
    k8s.v1.cni.cncf.io/networks-status: |-
      [{
          "name": "k8s-pod-network",
          "ips": [
              "10.52.2.122"
          ],
          "default": true,
          "dns": {}
      },{
          "name": "harvester-system/storagenetwork-95bj4",
          "interface": "lhnet1",
          "ips": [
              "192.168.0.3"
          ],
          "mac": "2e:51:e6:31:96:40",
          "dns": {}
      }]
    kubernetes.io/psp: global-unrestricted-psp
    longhorn.io/last-applied-tolerations: '[{"key":"kubevirt.io/drain","operator":"Exists","effect":"NoSchedule"}]'

Omitted...
Start VM Manually
After verifying the configuration, users could start VM manually on demand.